|
A guide to self reliant living |
||||
|
6. Kerosene heaters and cookers
12.
Electrical; generators
Miles Stair's SURVIVAL
Miles Stair's
SURVIVAL |
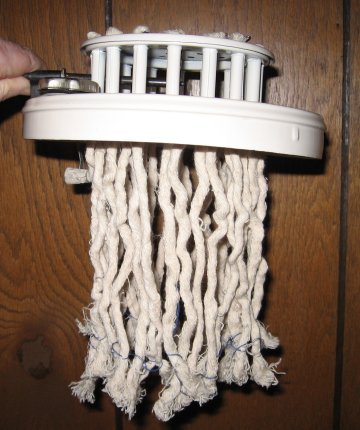
SETTING UP A BUTTERFLY MODEL 2628 STOVE
These instructions are for the older type Butterfly stoves sold during Y2K. Tens of thousands of the stoves were sold and few were actually set up to use. Many of them are being found in as-new condition, still in the original box. Those older stoves will work fine, but they do need to be set up correctly before use. 1. Remove the pot/pan support ring from the top of the stove. 2. Remove the brown top of the stove...it just slides up and off. Then carefully run your finger around the inside edge...you may have to remove a burr or two with a file before you reassemble (It is easy to know if there are burrs -- your finger is slashed). 3. Now you have the white circle of metal (body of stove) totally exposed. It is held in place with 3 Phillips head screws around the base. Remove the screws, lift from the back first, lift and bring it forward over the red wick riser handle, then remove it and set it aside. 4. You now have the brown base all by itself. The fuel pan is held on by 3 bolts with slot heads and wing nuts. Remove those, and the pan separates from the base unit. However, before you remove the pan, mark the side of the base assembly and straight down on the pan with a piece of chalk -- the 3 holes are NOT lined up perfectly! 5. The base unit, which has the wick tubes and wick riser assembly, is exposed. 6. With everything disassembled, now is the time to put a good coat of auto polish on every metal surface except the burner unit. Use a Q-Tip to reach all corners and crevasses, then when the polish is dry rub it with an old toothbrush. 7. From both the top and bottom, look at the tubes to make sure they are rounded out. They are actually rolled steel, not a tube, so they do have a seam. Make sure the edges of the seam do not overlap, using needle nose pliers to gently expand and round them out -- if needed. 8. Before you started all this, you need spare wicks. I have them at my Wick Shop. You can use a medium O Cedar mop head, or something similar, with the same thickness of strands as the short ones that came with the stove. Take the mop apart by cutting the stitches that hold the tape in the center, and you should have 64 wicks, each 23 inches long. Put Elmer's white glue into one end of the wick, about a half inch down, and try to draw it to a point. When the glue dries (overnight), it will make pushing the wicks through the wick tubes vastly easier. Your fingers will get sticky, but the glue washes off with soap and water. 9. Thread the wicks through from the bottom of the tubes -- the pan side. You may have to use a very small, flat bladed screwdriver to help push the wicks up through the tubes. Pull the wicks up until they are about a half inch above the top plate when the wick riser is in the full "up" position. Lower the wick riser so the wicks disappear, then raise the wicks so they are level with the top plate. Now you can adjust them so they are all about the same height. Then raise the wicks to the maximum height, and they should protrude no more than a half inch. 10. Around the bottom edge of the base assembly, which now has wicks hanging down from it, apply a thin film of Vaseline. This is a release agent, so you can someday remove the pan and put in new wicks. Use a Q-Tip to coat the edge of the lip with Vaseline. 11. Look at the pan. Notice it has about a half inch lip around the top edge. It *does not* fit flush with the bottom of the base assembly, and will leak if not fixed with a gasket. Feel all the way around the edge of the pan to make sure the lip is over the pan...if necessary, bend a tight spot out with pliers. 12. Apply gasket material full depth and width of the lip of the pan, going all the way a round without gaps. I use Permatex "Ultra Black" gasket material. Smooth with your fingers. Do not clean your fingers on your pants -- the gasket material is permanent and won't wash out. BTDT. 13. Locate the lost 3 bolts and nuts that hold the pan to the base assembly, then coat them liberally (sorry to use that word) with vaseline. 14. Line up the chalk marks (see #4 above), then *carefully* set the base assembly on the pan. Twist it back and forth a few times, then clean out the holes with a Q-tip, and make sure the bolt holes line up properly. 15. Gently push the base assembly down on the pan, make sure the lip of the base overlaps the pan all the way around, then insert the bolts from the top, nuts on the bottom, and tighten gently. Do not over tighten: no need, as the gasket material is going to fill up the space. 16. Set it aside for at least a day to harden. If placed in the sun, it will harden in a day, probably. Tighten the bolts and wing nuts snugly, but without bending the metal. When cured, gently tighten the bolts again. 17. The next day, find the three Phillips screws lost the previous day, and put the white, round body of the unit back on the base unit, fitting it over the wick riser knob first, then settling it into place. Do not over tighten the sheet metal screws...they are non load bearing, so they don't need to be stripped. 18. Now the burner assembly can be set back down inside the unit until it rests squarely on the base. 19. Making sure the brown top assembly doesn't have any burrs on the lower inside edge, you can set it back over the top of the white body without making any scratches in the paint -- and it will be easier to remove forever after (as the brown top must be removed every time you light the stove, this is an important step!). Then the burner support ring can be set in place, and you are all ready to cook, right? No. Not a chance. 20. Now you can fill the base with fuel, then let it sit for at least a half hour for the wicks to become saturated with kerosene. DO NOT OVERFILL! Use a funnel to pour in the fuel, and stop pouring when you see fuel at the bottom edge of the funnel...at least " below the fill hole. WAIT A HALF HOUR FOR THE WICKS TO BECOME SATURATED WITH FUEL! 21. Take the stove outside for the first burn, just in case you made any mistakes in setting the wick height. Remove the top and the black burner/combustor unit, light the individual wicks, replace the burner and top ring. Looking carefully down inside the burner, you can see if one wick is burning too high or another too low. Turn off the stove by lowering the wicks. Remove the burner unit when it is cool. Adjust by pushing one wick lower and pulling another higher to get them level (this is when you are really happy you rounded out the wick tubes!). 22. Relight, insert the burner unit, and let it burn for at least 5 minutes. At that point the burner unit is heated and the combustion more efficient, and you will have to lower the wicks until any yellow flames disappear. Then burn at least 8 hours. Refill with fuel, then repeat. By then the combustor unit (which is carbon steel) has the protective oil burned off and the steel is properly annealed to work properly. As the burner (combustor) unit becomes broken in, black paint will flake off. That is normal, so don't panic. Note: Setting up the Butterfly Model 2457 is very similar, except it is a square stove with 10 wicks. Otherwise, all instructions are similar.
Related links:
| 1. Food | 2. Manna Meals | 3. Water | 4. Sanitation | 5. Medical, health |
| 6. Kerosene heaters and cookers | 7. Lighting | 8. Wood cooking and heating | | 9. Communications | 10. Essential Tools | 11. Home built items | | 12. Electrical; generators and power | 13. War preparedness | 14. Gardening | |
|
||

