|
A guide to self reliant living |
||||
|
6. Kerosene heaters and cookers
12.
Electrical; generators
Miles Stair's
SURVIVAL
Miles Stair's
SURVIVAL |
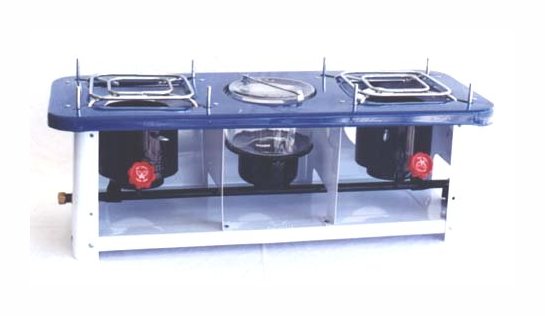
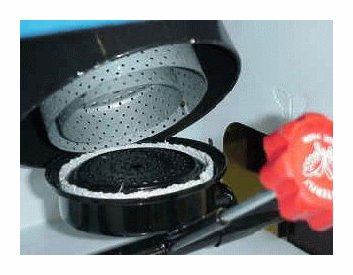
Wicks for Kerosene Stoves The Swastik, Premier and Butterfly model #2457 and #2628 multi-wick stoves can use thick cotton mop strands as wicks (commercial wicks are available at my Wick Shop), and raising the wicks increases the flame height and therefore temperature. The Butterfly saturated wick stoves (#2413, #2418, etc. - see images in Photo Index) use a proprietary wick standing on its side in a slot, with heat output controlled by the flow of fuel into the wick - they are available from my Wick Shop. With the Premier or other multiple wick stoves, simply pull up the wicks 1/8" and then snip off the top using the raised lip for uniform height. The Premier comes with two sets of wicks, and for about $5 you can purchase a medium O Cedar mop head, remove the stitching in the middle, and you have 64 wicks, each 23 inches long -- a lifetime supply even with everyday use! If you want commercial wicks they are available from St. Paul Mercantile. I have replacement wicks at my Wick Shop
INSTALLING WICKS IN MULTI-WICK STOVES - PREMIER & SWASTIK First, remove all fuel from the stove. This can be accomplished by simply by removing the top of the stove and catalytic converter cylinders, removing the fuel cap and pouring out any kerosene. Second, remove the wing nuts on the top of the tank. Third, lift off the wick riser assembly...carefully, as the wicks will still be very wet, so perform steps 1, 2 and 3 over a gravel driveway, preferably over weeds the kerosene can kill. Fourth, pull the old wicks out from the bottom. Now you are ready to install new wicks First, examine the new wicks. The wicks are wrapped with a heavy, waxed linen string or a metal wire. Save the thread...it is not tied in a knot. Second, fold the wicks in half, then put the linen string (or wire) through the loop of the fold until the string itself can be folded with the ends even. Third, push the waxed string (or wire) up through a wick tube from the bottom, then pull the wick up through the wick tube. Fourth, remove the waxed string (or wire) and do the same steps with all the other wick tubes. You will notice that the ends of the wicks that go into the fuel are frayed. That is just fine, as they must absorb the kerosene and wick it up to the top using capillary action. The wicks must reach from the top of the wick tube to the bottom of the tank, so the few inches of frayed wick at the bottom cannot be used in any case. (Note: It is possible to find some cotton mop heads with very thick strands; these should not be folded in half for use. Wrap the linen thread around one end and pull them through in as a single wick strand. Wal Mart cotton mop heads are thinner and ideal for folding in half for use as wicks.) When all the wick tubes have new wicks installed, raise the wicks to their highest setting using the wick rising lever. Pull the wicks up or down until they are all approximately level with the outside lip on the top of the wick riser assembly. Lower the wicks completely, and check to be sure they are all retracted down inside the wick tubes. Then reassemble the stove. Be careful to make sure all the wicks go into the bottom of the tank before reattaching the wing nuts. Refuel the stove, then wait at least 20 minutes for the wicks to become saturated with fuel before use! After the first use, you will have to adjust the wicks to the proper height, as the first burning of new wicks hardens the wicks and makes the tips easy to snip at a slight angle down, using the guide rails visible when the catalytic converter cylinders are removed. Related links:
|
|
||


