|
A guide to self reliant living |
||||||
|
6. Kerosene heaters and cookers
12.
Electrical; generators
Miles Stair's SURVIVAL
Miles Stair's
SURVIVAL |
REGULAR MAINTENANCE OF KEROSENE APPLIANCES Regular maintenance of kerosene appliances involves care of the wick, the wick raising assembly, plus the main body of the appliance itself. The wick:
In regular use, tar will accumulate on the top of the wick and inhibit the burning efficiency. You will notice a decreased flame height, and you can feel an obvious resistance or drag as the wick is moved up and down. That signals it is time to burn the wick dry and restore its efficiency. If you are burning a heater for 12 hours a day, it could require the wick to be burned dry weekly. If you try to run the appliance on a low heat setting, the wick will become carboned very quickly.
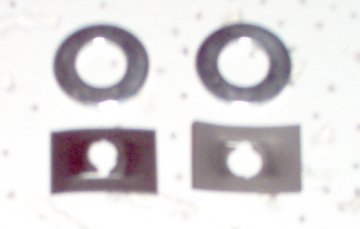
To burn the wick dry, turn off the heater, let it cool, then take it to the garage or designated draft free burn-out area. Siphon all the fuel from the tank. Next, remove the catalytic converter unit. Raise the wick to its maximum height. Then go around the top edge of the wick squeezing it between thumb and forefinger. You will feel a "crunching" as you fracture the tar particles. This only takes a minute, so go around and pinch the wick again. The smaller the tar particles the more complete they will burn up. If you have arthritic fingers, you can use paddle bladed pliers with smooth faces (Ace Hardware, "B-1", for example.) to pinch the wick. The fractured tar balls will burn completely. Reassemble the appliance, raise the wick to maximum height, and light it. Let it burn completely out. First the fuel in the wick burns, then the tar, and in a couple of hours the wick is again in pristine condition. Now the appliance will burn at maximum efficiency for a hundred hours or more until the wick again needs to be burned dry. If the tar ball buildup is so severe that the wick cannot be withdrawn, use the paddle bladed pliers and crunch the wick flat. If someone has installed the wick too high and burned it too long that way, it is possible to have a tar buildup inside the wick, looking like a black ring about 1" below the top of the wick. In that case, remove the wick, then use the paddle bladed pliers to crunch the wick flat. That will regain some capillary action, and then the wick can be washed with alcohol, reinstalled and burned dry, then wetted with kerosene and burned dry again. Often that will salvage a damaged wick so the appliance can be used until a new wick can be obtained. If you use a kerosene heater as your main heat source, the wick should be replaced annually. You're saving enough on your winter heating bill to justify a new wick. Be sure to wait for a half hour after refueling the appliance before using it, so the wick may again become saturated with kerosene. Wick raising (and lowering) assembly: I have seen fiberglass wicks with so much tar buildup on top that they cannot be withdrawn into the wick raising assembly, ratchets and levers so dirty they could not be moved, even wicks rusted to the center support column! All of those are the fault of the user, not the heater or stove. The wick raising assembly can be carefully scraped and then cleaned with an old toothbrush and kerosene and wiped dry once a year, and that will keep it working for years. If there is rust present on the central post assembly because someone stored the unit wet, with fuel in the tank, and water condensed and was able to get to the carbon steel post, then wire brush the rusted area, then sand it smooth with 150 grit emery paper. Stoves with multiple cotton wicks also need to have the wick raising assembly cleaned and oiled prior to storage. Remove the fuel, burn the wicks dry, then raise and trim them to the correct height. Then remove the entire wick raising assembly (usually 3 wing nuts -- this is NOT complicated!), raise the wicks to separate the tubes which are now visible from the bottom side, and lubricate the tubes with either WD-40 or Napa brand Chain & Cable Lube (my favorite). Use a toothbrush and auto polish to clean and polish around the outside of the tubes, then reassemble the stove. The area around the wick gap (below) often gets tar or carbon deposits, which can be cleaned off easily with a griddle screen. The Appliance Body Virtually all kerosene heaters and stoves are made of steel, either painted or enameled for a pleasant appearance and rust prevention. When the appliance is being prepared for storage, it should be burned dry, then completely disassembled. The body of the unit, including the stainless steel reflectors on radiant heaters and stainless steel grillwork on convection heaters, should be cleaned and polished with a good grade of auto polish/cleaner: my favorite is "Meguiar's Cleaner/Wax," which the maker claims is America's top selling cleaner/wax. It's cheap, and it works. Don't forget to polish the inside of the metal cabinets! FIXING A LOOSE CARRY HANDLE ON A CONVECTION HEATER Many, if not most convection heaters have a carry handle in the shape of a "U" which attaches to the heater by simply slipping into holes on each side of the tower assembly. The problem is that one side of the carry handle can slip out and the heater can be dropped. This problem is almost universal...and extremely easy to fix. Remove the top safety grill, then the top plate on the heater. Now you can look down into the heater and see the ends of the carry handle protruding through the metal sides of the heater. Slide a 5/16" washer over each end, then a 1/4" "Kwik-Clip" over each end and slide it back as far as you can, and the carry handle will not be able to come loose again. Some carry handles are less than 1/4" diameter chromed rod and would require a smaller "Kwik-Clip," and they are available in just about any small diameter.
You're done.... The unit is now cleaned and polished, the mechanical wick raising assembly cleaned and lubed, and the appliance body polished and thus protected against stains and rust. The fuel tank is empty, so water vapor will not condense in it and cause rusting. You removed the igniter batteries when you removed the cabinet body, so leave them out now. And you have examined the wick(s), and if replacement is needed, now is the time to at least order the proper wick. Now the unit may be safely stored -- covered! -- in a dry area, and you can be certain it will be ready for use just as soon as you need it again. Is this all really important? Yes. I have had to practically rebuild convection heaters from scratch for friends because they were simply put into a damp outbuilding after the last use. They were rusty and a real mess, and there is no excuse for it! A few years ago I was given a Toyotomi RC-87A radiant heater for free. It had been put away wet -- in a barn loft, under hay bales. It was rusty and dented, the electrical starter system so corroded it could not be fixed, with mouse nests in the wick raising assembly area. I was able to make it work again, but it wasn't worth the effort...a $200 heater ruined for lack of a half hour of maintenance work! If you follow the guidelines above for regular maintenance before storing your kerosene appliances, they will keep in pristine condition and be ready for use within 20 minutes of when you need them -- just fill with fuel and install the batteries. Related links:
| 1. Food | 2.
Manna Meals | 3. Water |
4. Sanitation |
5. Medical, health |
| 6. Kerosene heaters and cookers | 7. Lighting | 8. Wood cooking and heating | | 9. Communications | 10. Essential Tools | 11. Home built items | | 12. Electrical; generators and power | 13. War preparedness | 14. Gardening | |
|
||||


