|
SITE
INDEX
QUICKENING
NEWS
PREPARATIONS
1.
Food
2.
Manna
Meals
3.
Water
4.
Sanitation
5.
Medical,
health
6.
Kerosene heaters and cookers
7.
Lighting
8. Wood
cooking and heating
9. Communi-cations
10. Essential
Tools
11. Home
built items
12.
Electrical; generators
and power
13. War
preparedness
14.
Gardening
SITE
INDEX
Miles Stair's SURVIVAL
SHOP
HOME
RADIATION
INDEX & JET STREAM
PROPHECY
COMMENTARY
BY MILES
BOOKLETS
BY MILES
GUEST
SUBMISSIONS
PHOTO
INDEX
LINKS
SITE
INDEX
Miles Stair's
SURVIVAL
SHOP
|
|
Build a
mini-Conestoga Bug-Out Trailer
The idea of
having a small trailer to pack full of survival gear
for a "bug-out" appeals to many people. Who knows
when an evacuation may be needed for any number of
causes? Those first out when the need arises
often beats the rush, and that can mean survival or
being stuck in a traffic jam on a freeway, going
nowhere and facing whatever caused the evacuation to be
faced in perhaps the worst conditions
possible.
The actual
building of such a trailer can seam daunting. It
really is not that hard. The actual construction can
take place over time using regular tools, paying cash
for the materials as needed so there is no huge cash
outlay all at once.
The frame for the
trailer can be a small 4 x 6 foot utility trailer such
as those sold at big box stores. It is possible
to get lucky and find a small trailer really
cheap. That is what found. The trailer I
got for free was just a frame with too short of a
tongue, only 3 cross-members, 8" wheels, and 3 1/2 feet
wide. But it was a good beginning.
In designing a
trailer, remember wind resistance: for towing, the less
wind resistance, the greater the tow vehicle's fuel
mileage. And with a typical small vehicle these
days having only a 4 cylinder engine, the least wind
resistance possible translates into much easier towing
ability.
|
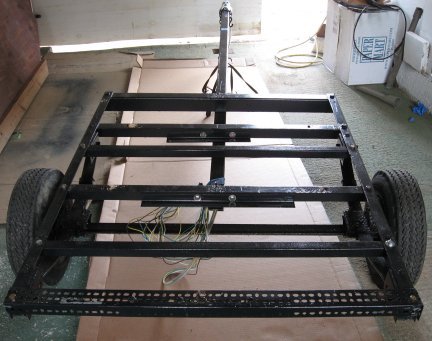
Here is the
frame for my trailer after adding 3 more
cross-members. Metal bed rails are strong
enough and can be found for free at metal
recyclers or the local sanitary landfill.
My trailer had a short 4 foot long tongue.
That I replace with an 8' piece of 2" square
tubing, 0.180" thickness. To ease later
construction, the trailer hitch is installed and
wiring (see below) threaded through the tongue
before the bed is attached.
|
|
|
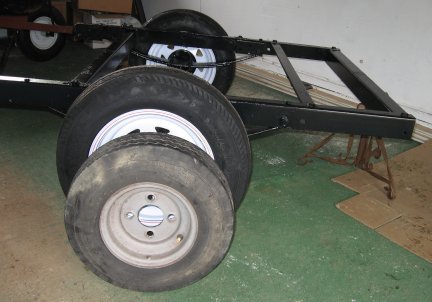
Most small
utility trailers are supplied with 8"
wheels. They are too small. I
purchased 12" wheels. You can see the
difference in the photo at right. Also see
the frame with only 3 cross-members and compare
it to the photo above as modified with 3 more
cross-members. All construction will take
place with the 8" wheels on the axles. When
complete the 12" wheels can be installed.
The 12" wheels can also be balanced.
|
|
|
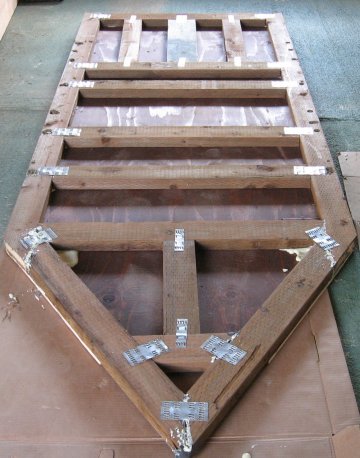
At right is
the frame for the bed of my trailer. The
rectangular section is 6' 6' long - the length of
a common air mattress. The V-nose section
is 3' 4" long for a 38 degree V. I used
pressure treated 2 x 4's and 1/2" plywood.
The plywood was screwed and glued to one side.
Screws, not nails. Nails can back
out. Every surface of the wood except the
top was painted so glue would adhere properly,
than plywood glued and screwed to the surface
shown at right. Painted wood lasts at least
10 times longer than unpainted, even if not seen,
so it is worth the trouble.
|
|
|
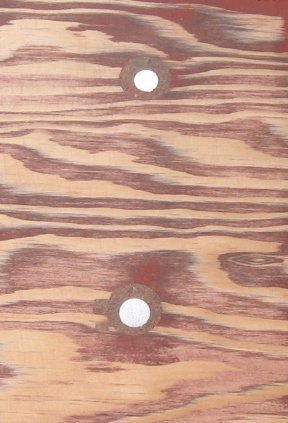
The bed is
set upon the frame, then the tongue weight
measured using a bathroom scale. Slide the
bed back or forward to achieve about a 50 pound
tongue weight. When the framing and siding
are installed the tongue weight will be about 80
to 100 pounds, ideal for towing. Once positioned,
I used carriage bolts to secure the bed to the
frame and cross-members. I wanted a flat floor,
so first the holes for the carriage bolts were
countersunk using a 3/4" Forstner bit wood
drill. After bolting the bed to the frame,
I filled the space around the carriage bolt heads
with a paste mix of Elmer's Wood Glue and
sawdust. That mix takes two days to
dry. Then it is sanded smooth with a belt
sander. After painting it is impossible to
see where the bolts are located! Presto, a
perfectly flat floor.
|
|
|
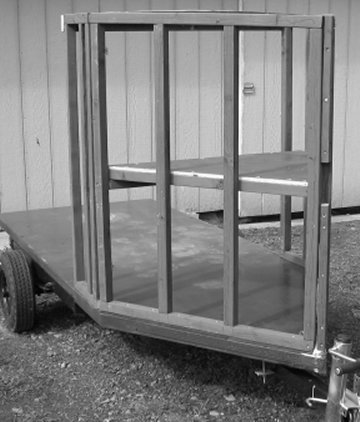
At right is
a photo of the V-nose framing. I used 4
foot high 2 x 2's for the framing. A shelf
was built to add rigidity to the nose. Note
that the sidewalls of the nose extend back one
foot into the straight sides. When covered
with a piece of 1/2" plywood, the sidewalls are
tied into the nose section, adding rigidity to
the sidewalls. The remaining uncovered top
section can be left as is or a cover can be made
from 2 x 2's and 1/4" plywood. Add a back
door and the trailer is virtually waterproof and
lockable.
|
|
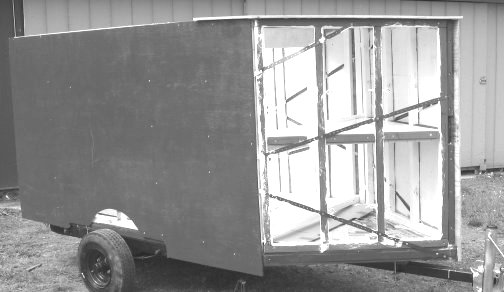
|
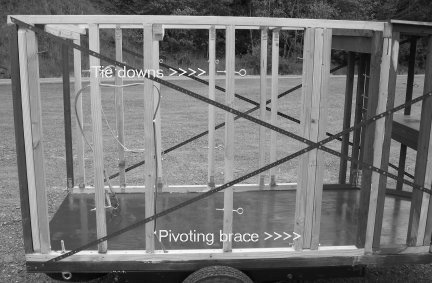
The photo at right must be enlarged to see
details clearly. Look at the near side and
you will see three studs side-by-side. The
opposite sides have two studs with a spacing
between them. That center stud pivots on a
bolt at the bottom and swings parallel to the
bed, locking into place in the gap on the other
side. That prevents items inside the
trailer from sliding forward or backward when
under tow. There are three of those braces,
one at the rear, one at the front, and one marked
with the pivot. Also notice all the tie-down
eye-bolts.
|
|
|
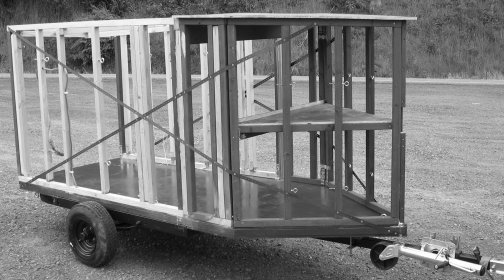
Here the
framing is complete. The 1/2" plywood top
over the V-nose extends back a foot onto the
sidewalls. The front of the V-nose is 2"
lower than the back to shed rainwater and lower
wind resistance. Note the construction strapping
to add additional strength to the
sidewalls.
|
|
`
|
Wiring for
trailer tail lights is first threaded through
5/8" clear vinyl hose, then put through the
tongue, before the bed is bolted on. It's
easier that way. Then the wiring can be
ignored until the framing is complete. For
my trailer I purchased LED taillights because
they use very little electricity. Even a
small car with a 4 cyl. engine will have a large
enough generator to use the trailer lights
without draining the battery on long trips at
night.
|

|
|
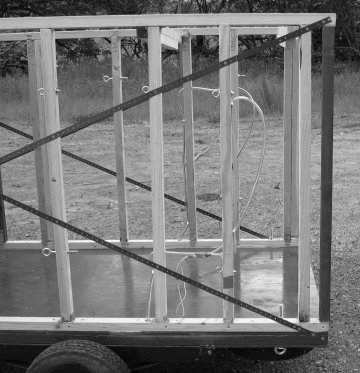
The photo
at right shows the wiring coming up through the
bed and stapled to the stud walls. Here I
used 5/16" clear vinyl tubing because only half
the wires go to each side. With this system
the wires from plug-in on the vehicle to the
taillights are all encased in vinyl tubing.
Trailers bounce and vibrate, but with wiring
encased in tubing there is nothing for the wires
to rub against to break or short out.
|
|
|
The photo
at right shows all but one piece of exterior skin
applied. All of the wood was painted except
where wood that would be glued to other
wood. The sidewalls are cut to accept the
fenders. The screws used to fasten the 1/4"
plywood to the studs were countersunk. Then
the holes are caulked and sanded
smooth.
|
|
|
Here is the
body with 1/4" plywood sidewall skin
painted. Now the fenders can be installed,
and the new 12" wheels. Trim can now be
added, such as tie-down hooks. The
taillights can be installed. The trailer
can then be used. I'm going to add a cover,
hinged at the front, and a back door. Then
the trailer can be locked up as well as being
virtually wind and water-proof.
|

|
The trailer can
be used for general hauling purposes or packed with
camping and bug-out supplies. If left empty for
general purpose trailer use, all the bug-out gear can
be stored in sealed plastic buckets stored nearby,
ready for quickly packing into the trailer and a fast
getaway. If kept in ready-to-go condition, the
trailer should be jacked up and short blocks placed
under the axle close to each wheel. Be sure to
check tire pressure every six months or so. When
needed, the trailer can simply be jerked off the blocks
and towed away.
Home
Built Items & Essential
Skills
|
|
|
