|
A guide to self reliant living |
|||||||
|
6. Kerosene heaters and cookers 12.
Electrical; generators Miles Stair's SURVIVAL Miles Stair's SURVIVAL |
BUILDING A SOLAR OVEN
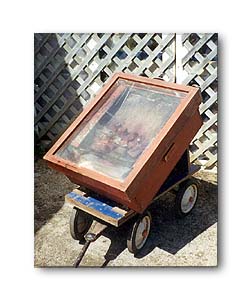
Building a solar oven that will have the ability to reach 220 F within 2 hours of direct sunlight is relatively easy. The solar oven I designed and built has served me well for many years. My oven fits on a platform with wheels to tow around, and is so sturdy it will last for decades. Basically, a solar oven or wax melter is a wooden box with a double - glazed removable lid, propped up at an angle of about 40 degrees. But geometry comes into play here, as that would mean the bottom of the box itself would not provide a level cooking surface. That problem is overcome by placing a metal plate on the bottom so it is level when the box is tilted up. Then the sun can shine directly into the box, so reflectors are not needed.
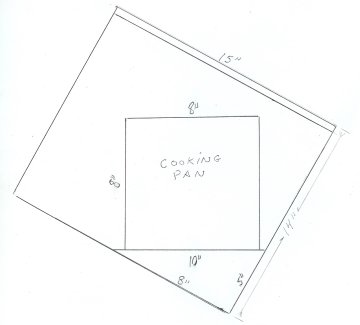
The minimum external dimensions of a solar oven are about 21" wide and 24" long, with a depth of about 21 inches. Once the leveling plate is put squarely in the bottom, the depth decreases to about 14 inches (assuming an angle of declination of 40 degrees), which is deep enough for most cooking pots. (The bottom level cooking plate would be 9" above the bottom in the front, and touching the bottom on the back, reaching from side to side, for a cooking surface of 14 by 18 inches, approximately.). The inside back of the solar oven is then automatically set for a reverse angle of 130 degrees, so it reflects solar heat directly to the cooking containers.
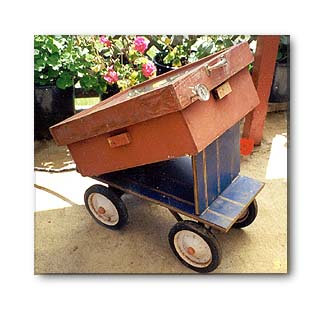
The easiest material with which to build the solar oven is " plywood. The inside is then covered with either 1 " thick wood, if available, or so-called "insulation board," which is a dense foam with a heavy metal foil on each side. There is a temptation to use Styrofoam, but you would discover quickly that Styrofoam melts at the temperatures of over 250 degrees reached inside a solar oven! Wood is a good insulator, and if covered with thin sheet metal makes a very sturdy unit. However, the oven becomes too heavy to move about with ease, so mine is mounted on a small trailer (Using a child's discarded wagon wheels and axles.).
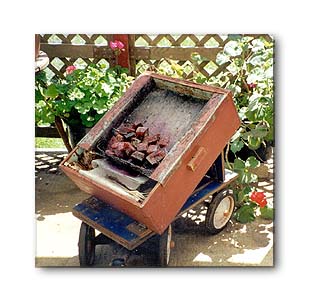
Miles made his oven portable with wheels from a discarded child's wagon. Note the thermometer in the top left corner of the frame. The lid or cover for a solar melter can be constructed using 1" by 4" clear board, on edge, about three-eight's inch larger in inside dimensions than the outside dimensions of the box, so it will be easy to remove. For glazing I used Plexiglas: it is far lighter and sturdier than glass. To make the double glazing, I laid the top down on a flat surface, made sure it was square, and nailed on " x 3/4" square molding on the bottom. Then a piece of Plexiglas was cut to fit, laid on the molding, and another round of molding fitted with small screws, then another piece of Plexiglas, then another round of molding. When inverted, the top will fit over the box to a depth of about an inch and a half, which is sufficient for strength and security, and the double glazing of Plexiglas with a " air gap has a good insulation factor. I put a grab handle in the center of the back of the lid, just to make it easier to maneuver. How does one elevate the solar oven and make it portable? I used the wheels, axles, and tongue from an old child's wagon that Bette found at the recycling center (A.K.A. "dump"), mounted under a piece of 3/4" plywood measuring 15 x 30." The solar oven is fastened near the front of the plywood base using two door hinges, and near the back I have an 11" tall piece of plywood that is also hinged at the bottom. On the bottom of the solar oven, at the back, I placed two left over strips of molding about 3/4" apart, which provide a slot for the plywood prop. Because the solar oven and the prop are secured with hinges, it can be stored when not in use in the down, or flat, position. To keep the glass clean in storage, cut a piece of flat cardboard to fit the glass, then make a tab with duct tape in the middle of the top so the cardboard may be easily removed. To use the solar oven, I merely raise the back, lift up the prop, set the box down so the prop is in the slot, and it is automatically raised to about 40 degrees and ready for use! I can tow it with the tongue handle to move it where I want it to be, easily turning it directly facing the sun. And I cheated: I drilled a 3/8" hole through the lid (under the glazing) and the solar melter, so an oven thermometer can be inserted through the hole and read the temperature inside the oven. SOLAR WAX MELTER Those who intend to melt paraffin to make candles need to do one more thing. A melting pan must be made which hangs from the sides of the oven, is about 3" deep, and is about 3 inches less in length than the length of the box. The front of the pan is "boxed" to retain the wax sliding down, and three " holes drilled near the center allow melted wax to pour out directly in the center of the lowest point on the pan when it elevated to 40 degrees. It is best to have a sheet metal shop stamp one out for you from galvanized 16 gauge sheet metal. In use, the melting pan is filled with enough wax to fill a bread pan, and the bread pan placed on the flat cooking surface under the front of the pan. The heat of the sun melts enough wax (about 4 pounds) to fill a bread pan in about an hour and a half, the melting wax running down the melting tray, through the holes in the bottom of the tray, and into the bread pan. Remove and replace the bread pan when the temperature is close to 200 F, add more wax, turn the solar oven to face the sun again, and you should be able to get 4 or 5 bread pans full per day from May through September. Set them aside in a safe place - the wax is hot! - and they will cool overnight enough to easily drop out as nice ingots for later use (in the case of reclaiming used wax for later use), or pour the wax directly into candle molds. If the wax being melted is recycled and contains any foreign matter (bits of wick, etc), cut a piece of aluminum window screen and bend the sides so it fits tightly over the bread pan, and all the debris is collected on the window screen and the wax is left pure.
FIRST USE OF A SOLAR OVEN Newly built solar ovens are always a great disappointment, as they fog up the glazing inside and won't heat anything! Don't get discouraged. Wipe off all the moisture, and repeat that for about a week, and by then all the moisture in the wood and insulation will have been evaporated and the solar oven will begin to work at maximum effectiveness. CLEANING THE CLEAR SOLAR COVER The glass or Plexiglas cover of a solar oven will become dirty over time, which reduces the effectiveness or solar heat transmission by a considerable margin. Both the top and bottom surfaces of the top, be they Plexiglas or glass, should be cleaned and polished with a good automotive cleaner/wax such as Meguiar's Cleaner Wax, which is as effective as Plexiglas polish and less than half the cost. The auto cleaner/wax will won't leave any moisture residue to fog up the glass for a couple of days, and as cleaning the glass is a weekly event when in everyday use, that is an important consideration. ~~~~~~~~~~~~~~~~~~~~~~~
|
|
|||||