|
A guide to self reliant living |
||||
|
6. Kerosene heaters and cookers
12.
Electrical; generators
Miles Stair's SURVIVAL
Miles Stair's
SURVIVAL |
Garden
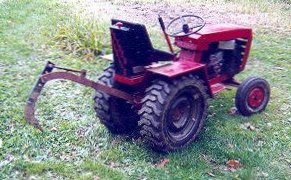
Tractor Gardening Part III - Preparing the soil to plant by New England Gardener This past year, 2006, I experimented with an exciting new way to deeply loosen the soil directly under row crops. This is done just before planting. What I was looking for was a tine I can pull with my small tractors, well below the depth of a moldboard plow or rototiller. A single cultivator tine, or a very narrow V shaped furrower will work if you add weight to keep it in the soil, but the box blade tine's shape pulls it deeply into the ground. For only $15 each, I purchased box blade replacement tines from Agri Supply http://www.agri-supply.com Model ASC 49684.
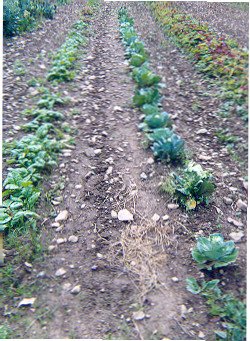
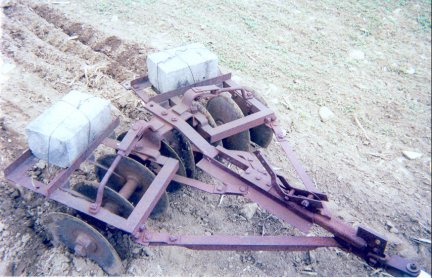
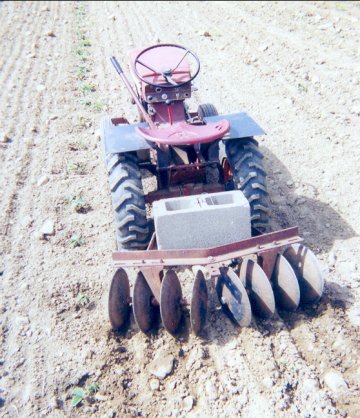
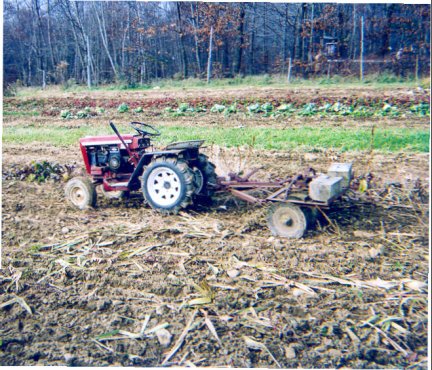
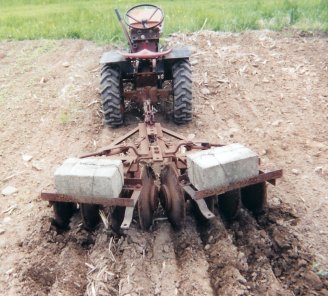
Box blade tine bolted to Wheel Horse 'slot hitch' mold board plow frame This model has 4 bolt holes in the shank, and is about 18 inches tall. I have been able to bolt these on to Moldboard plow frames made by Wheel Horse for there slot hitch plow, as well as onto my ten inch Brinly Hardy sleeve hitch mold board plow frame. It may take a little modification to attach it to my Simplicity two wheel tractor moldboard plow frame. It will not fit on David Bradley two wheel tractor plow frames without cutting and welding. It would definitely be worth doing though. Box blade tine digs deep into the garden soil Although the tine itself is relatively narrow, it loosens the dirt to a width of 4-5 inches, and a crown or hump in the soil, is raised a couple inches by the inclined blade, and then falls back to leave a flat surface. A single pass is perfect for narrow crop roots, like beets, carrots and onions. You should make a second pass, offset a couple inches to one side for beans or corn, and three adjacent passes for potato or a wide row of peas or carrots. This tine pulls very easily through the soil with a 5 horse power rider at 2-3 mph. I believe a two wheel tractor weighing 250 pounds or more could do the same with half the horse power.
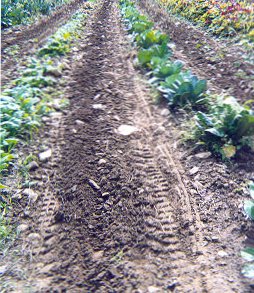
Making a row to plant with the box blade attachment Although the moldboard plow seems to be the traditional tool of agriculture, some of the early plows worked more like my box blade tine, and so called Low till or No till Farming has gained a lot of ground for conserving moisture, and it does not bring weed seeds close to the surface where they can germinate. Mold board plows can also create a hard pan just below the depth they reach, and the heavy weight needed for traction to pull them compresses the soil. When moldboard plowing, the right side wheels are run in the bottom of the previous furrow. This tilts the tractor to that side, and takes weight off the left wheel, making it more likely to spin. Because the box blade is centered behind the tractor, and the drive wheels are level, it is easier to get enough traction. I thought of making a frame to hold two or even three of these blades, but it takes so little time to make an extra pass, and I alternate wide and narrow crop rows in my garden. It would take more time to change the attachment. It would be handy when planting a large area of corn though.
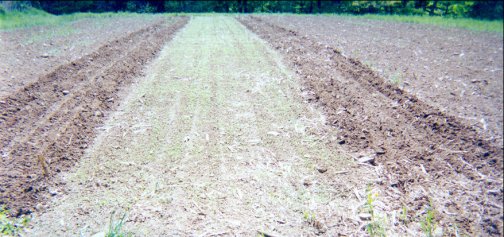
This is what the row looks like after the box blade tine has deeply loosened the soil. It's now ready for spinach seed to be broadcast in a wide row, and gently covered with a rake Disk harrows are the easiest way to keep the top few inches of soil weed free. They should have enough extra weight added stay in good contact with the ground. With a rider tractor, you should be able to operate at 2-3 miles per hour, and at about half that speed if you are walking behind a two wheel tractor. With a four wheel tractor, a large disk harrow [like I mentioned in the first article in this series,] is ideal for use in the Spring and Fall.
Here it is easy to see how to make passes with a harrow in my quarter acre grain plot. I started at the right side, made a turn at the end of the field, and came back up on the left side of the photo. The next trip around the field will be along the outside side of these first two passes. The crop in the middle is young Flax for seed. You can use the front half of a disk harrow intended for the smallest farm tractors, like the 4 cylinder International Cub. The ones made for ATV's like Agri Supply's item # 41342 . Another way to go, is to simply pull a unit made for a Category '0' three point hitch along the ground like a cart. Here is a link to Brinly-Hardy's offering and Agri-fab offers one too. For a two wheel tractor, you will want one made to fit your tractor, or you can narrow a sleeve hitch style like this or this. To get it to dig in deep enough, remove one or two disks from each side, and use shorter 'axle bolts'.
Look carefully at the depth this heavy five foot wide disk harrow is digging into the soil, as it tills in a light cover crop of buckwheat. It is being pulled by the same 5 horse power tractor shown in the other photos on this page. With the extra weight to really dig in, this is all you will be able to handle easily, behind a medium size two wheel tractor. You will end up with a space between the disk gangs. Let's say your disk harrow is 30 inches wide. Your gangs each cut a width of 11 inches, leaving a gap of 8 inches between them. On the second pass, have one gang work the soil in the gap, and the other work the ground along one side. This will give you a bed about 45 inches wide. A medium size two wheel tractor will take 2-3 times as long to cover the same area, and may not go quite as deep, but it will probably use less fuel, since it is not carrying you, and it also weighs much less.
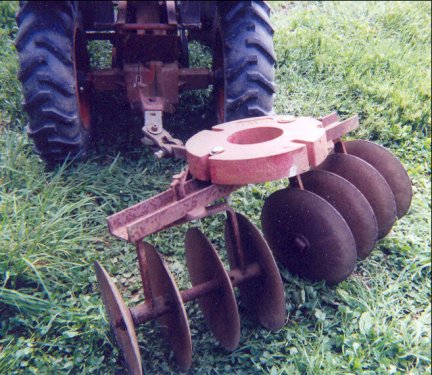
This three foot wide disk harrow attaches to the liftable hitch on the back of the tractor, so it can be raised out of the ground at the ends of the row. If the two disks near the center were removed, it could straddle a row. Set up like this, it moves the soil away from the center, toward the sides. When using any type of cultivator, make a pass, and then make a comfortable turn at the end of the row, instead of coming back right along where you were. If you are cultivating rows, do the 1st and 5th, and then the 2nd and 6th, and so on, working your way across the garden. Allow enough room to make the turn at the ends of the rows without slowing down. This will save you time. A disk harrow with a gap in the center can also be used for cultivating and hilling garden rows on both 2 and 4 wheel tractors. By driving over the rows, you are cultivating two paths at the same time, or both sides of the plants. The taller the crop clearance under your tractor, the longer into the season you can do this. This narrow 30 inch wide disk harrow was made for a two wheel tractor, but is perfect for hilling the rows of cucumbers or summer squash on either side of a path. Notice it is pulled behind the tractor like the large harrow, or like a cart. This is an advantage, because it turns sharply, without having to be raised out of the ground. You can even make a tight circle around a large hill of pumpkins or winter squash. My larger riders are 36 inches wide. When I overlap the tire tracks, my rows end up 30 inches apart. A small walking tractor 22 inches wide can cultivate each path after the rider will not clear them. With my 30 inch wide Wheel Horse riders, the rows are 24 inches apart. So I have taller walking tractors, able to straddle the rows after the riders can't. By using very slow ground speeds, I can let the crops brush against the bottom of the tractor. Here is the five foot disk harrow again, tilling in corn stalks in the Fall. Just beyond the tractor, are beets, and on the other side of the grass access strip, are cabbages and strawberries. Now I have to admit that I really like tractors, and have far more of them than I need. So what am I recommending to those who want to work the soil with the least amount of fuel? The size of the tractors made in the 1950's and 60's is big enough, and mine were easily re-powered with modern, dependable and thrifty gas engines. You could also use a battery electric motor system, recharged with solar panels, or a small diesel engine. Two or three horse power is enough for 2 wheel tractors, and five or six is plenty for riders. Diesels can be less, if you can find them that small, and electric motors 1/3 the horse power of gas engines are commonly used to power hammer mills and corn grinders and shellers. With electric motors, speed controllers are expensive, it makes more sense to choose a tractor with gearbox selected speeds, like the medium size Simplicity and Midlands, or set it up pretty slow on a light single speed model. If you are gardening to feed a family, the medium size walk behind tractors, like the David Bradley's or the Simplicity and Midland models that came with 5 - 7 horse power engines and shift able gearboxes will be enough. You may want a small Sears or Wheel Horse rider, especially if you plan to grow grains, or haul firewood. The light two wheel tractors, like Simplicity's 2 or 3 horse power L series, make an excellent second tractor for cultivating the rows, but wouldn't be adequate by them selves, unless you have really light soil. Midland also made an intermediate size, where speed changes are made by moving the belt to a different set of pulleys, as well as the larger 5-6 horsepower models. You will have to choose from what you can find in the paper or at tractor shows and swap meets. Of course there are other good brands too. GARDENING ARTICLES by New England Gardener -
|
1. Food | 2. Manna Meals | 3. Water | 4. Sanitation | 5. Medical, health |
| 6. Kerosene heaters and cookers | 7. Lighting | 8. Wood cooking and heating | | 9. Communications | 10. Essential Tools | 11. Home built items | | 12. Electrical; generators and power | 13. War preparedness | 14. Gardening |
|
|
||


