|
SITE
INDEX
QUICKENING
NEWS
PREPARATIONS
1.
Food
2.
Manna
Meals
3.
Water
4.
Sanitation
5.
Medical,
health
6.
Kerosene heaters and cookers
7.
Lighting
8. Wood
cooking and heating
9. Communi-cations
10. Essential
Tools
11. Home
built items
12.
Electrical; generators
and power
13. War
preparedness
14.
Gardening
SITE
INDEX
Miles Stair's SURVIVAL
SHOP
HOME
RADIATION
INDEX & JET STREAM
PROPHECY
COMMENTARY
BY MILES
BOOKLETS
BY MILES
GUEST
SUBMISSIONS
PHOTO
INDEX
LINKS
SITE
INDEX
Miles Stair's
SURVIVAL
SHOP
|
|
Water Hand Pump
I wanted a hand water
pump just as a backup source for very long term contingency
planning. A standard pitcher pump would not work as they
still require carrying water in buckets. A sealed
pitcher pump was the answer. A sealed pitcher pump
can be connected to household pipes, often by backfeeding
through existing plumbing, so the water can be pumped directly
into a house - sinks fill, toilets flush, etc, and all without
carrying water!
As the pump would not be
used for long periods of time, a PVC pump made more sense than
a traditional cast iron pitcher pump. UV radiation
damage was not a concern because the pump would be located
indoors in an existing well house.
The wells in my area go
down between 90 and 100 feet for water. A standard pitcher
pump is limited to about 20 feet of depth. A pitcher
pump will operate that deep, but only with the pump sitting
directly over the well casing with a long operating rod to
pull a leather washer at the bottom of the well to PUSH water
to the top. Such a water system will indeed work if
there is no alternative for potable water. I did not
want an exposed system like that nor did I want the extra
effort required to pump the water from that depth.
It took quite a bit of
witching with copper rods, but I found a shallow well source
that was very low capacity, low recovery, but certainly good
enough for a hand pump. I hit water at 18 feet, and it
was below the clay layer so it was not surface water, hence
contamination was not an issue. The well hole was dug
with a auger-style post hole digger, adding 4' sections of
3/4" galvanized pipe as needed to dig a hole 20 feet deep. It
was hard work. For a well casing I used thick-walled 3"
PVC pipe. The standing water table inside the casing is
up to 10 feet from the top of the well.
 |
 |
|
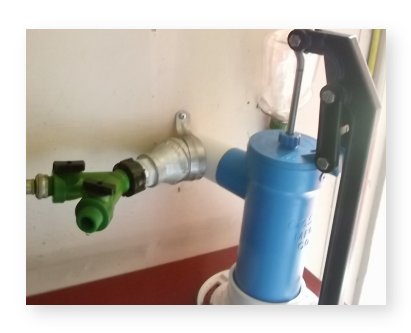
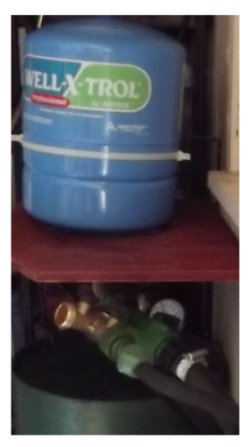
Above, the Oasis Pitcher Pump installed
|
Exit plumbing to base of small pressure tank |
The pump I chose was made
by Oasis. It was advertised as being black and having a
replaceable suction pump, but that was a lie. I was sent
a blue sealed unit that cannot be repaired. It
does work but is not the pump advertised and shown on the web.
|
The installation shown on this page is not finished and ready
for winter. |
The Details
Installing the pump and
getting it working following the factory instructions was
impossible. The instructions call for using a 2"
diameter well pipe and no foot valve. Total insanity.
Deep well hand pumps have a long lift rod to pull a cup that
pushes water to the surface. The wider the cup the more
water that can be pushed upward. A shallow well hand
pump, however, uses suction to bring water to the pump, yet
the instructions still call for a 2" drop-pipe in the well
casing. One foot of water in a 2" pipe is 0.163 gallons.
My 18 foot long drop-pipe would thus have to lift 24.48 pounds
of water - by suction alone! That is not going to
happen. In actual trials the hand pump would not lift an
18 foot long column of water in a one inch pipe - 0.0141
gallons per foot, 18 feet of water weighing 6.12 pounds.
Just as a test I used a 5/8" garden hose with a 3/4" foot
valve as a drop-pipe and the hand pump finally pumped water!!!
The hand pump will suction 3 pounds of water up 18 feet without much effort required
for pumping.
The output for my system
using a 5/8" garden hose drop-pipe averages 3 gallons
per minute of pumping at an easy rate and light effort that
can be sustained for awhile. It takes 1 1/2 gallons of
water per toilet flush, on average, and perhaps 6 gallons of
water to wash dishes or clothes by hand. The hand pump can
provide sufficient water for normal sanitation requirements,
where "normal" would be an absence of electricity and hot
water means heating water in a stock pot on a
kerosene stove and washing
clothes with a scrub board and wringer for line drying.
The factory instructions
say to remove the check valve if using a foot valve at the
bottom of the drop-pipe, or drilling a small hole in the drop
pipe below the front line to relieve pressure. Of course
with the new glued-together pump design it is impossible to
remove the check valve. It does not matter. The
pump will work just fine with the check valve in the pump AND
a foot valve at the bottom of the drop-pipe, and the pump does
not have to be primed before every use.
The supplier also says
the hand pump will build pressure to supply the second-story
of a house with water. I could get to 10 pounds of
pressure, but anything more than that required too much effort
to make it worth while. It would be possible to pump
water to a second floor, but the effort required would be
substantial. For pumping higher than the first floor of
a home a small pressure tank such as the one I installed will
make the work a little easier. The system works better by using
gravity flow, pumping into a container higher than the sinks
in the house, with water flowing via gravity from the
container (or small pressure tank) to the house.
|
 |
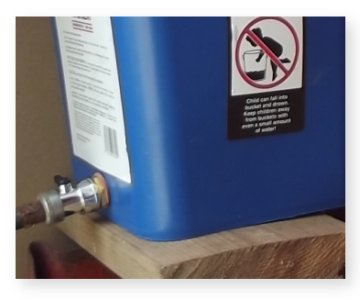
Left, the well is 20 feet deep, water up to
10 feet from the top.
The white 5/8" hose drops to within 6" of the bottom of the well
and has a 3/4" foot valve. The area around the well
casing is sealed with concrete to keep out surface water.
Right is the modified bucket for
priming the well. The hose from the bucket connects to the
right side of the "Y" at left. |
 |
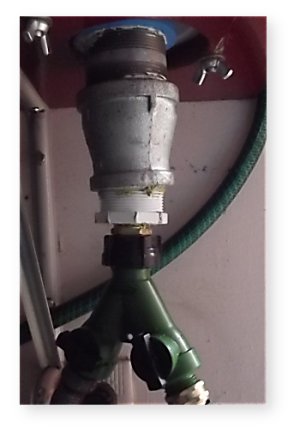
Above left shows the
heavy-wall 3" PVC pipe I used as a well casing. Just above the
surface I placed a 3" x 3" x 1 1/2" "T" fitting, as shown.
A full-flow 3/4" "Y" fitting attaches to the end of the 5/8"
hose used as a drop-pipe. The right side of the "Y"
leads to the hand pump, the left side has a washing machine
hose attached which leads to the blue bucket shown above
right. To prime the drop-pipe the bucket is filled with
water, both valves opened, and water can fill the drop-pipe
via gravity rather quickly because the displaced air can
escape up the hose and through the water in the bucket.
It would seem logical to use a garden hose from another source
of water would lead to faster priming, but that is not true
because there is no way for air to escape from the drop-pipe
and line to the hand pump. A simple bucket connection
not under pressure allows air to bubble up so the drop-pipe is
properly filled ("primed") with water. After
initial priming the bucket and hose can be disconnected and
saved for the next time it is needed.
Those living in areas
where it gets really cold will need a set-up like the priming
bucket shown above. To protect the pump and lines from
freezing, a tiny hole can be drilled below the frost line in
the drop-pipe. That will drain the water down to the
small hole to prevent frost damage to the pump and water
lines, but it will mean that priming is necessary before
the pump is used again. The priming bucket is simply a
very fast, easy means of priming the drop-line and hoses/pipes
leading up to the pump.
It should be noted that
this is a test set-up. Before winter the hoses will be
re-routed and covered to be frost-free...and then not be
visible for photographs.
|
 |
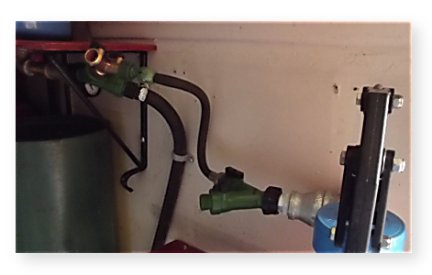
At left, the plumbing under the pitcher pump.
The full-flow "Y" connector on the right side is from the well,
the left side is for priming the pump. See the bottle in
the top left photo that is connected to the hose for priming the
pump - it is visible to the right on the wall behind the hand
pump.
At right, the 2 gallon pressure tank.
The right side hose is from the pitcher pump, the left side is
for draining the tank - bleeding the system. The hand pump
is capable of pumping up to 10 pounds pressure, but it is a lot
of work. In actual use the tank is merely an accumulator
and conduit for water to flow via gravity to the house.
|
|
|
Above left. Connected
to the bottom of the Oasis Pitcher Pump is a 2" x 3 1/2" galvanized
nipple, a 2" to 1 1/4" galvanized reducer, a plastic 1 1/4" to 3/4"
reducer and a 3/4" NPT to 3/4" garden hose adapter. The extra
capacity for water directly under the pump with these adapters
allows for easier filling of the pump chamber. |
Above right.
The pressure tank 3/4" connection is fitted with a 3/4" NPT to 3/4"
garden hose adapter, then a full flow 3/4" "Y" valve with individual
shut-offs. One side of the "Y" is connected to the pump with a
short section of 3/4" garden hose and the other side with a 3/4"
garden hose to a "T" connector to a galvanized pipe leading to the
house water system. |
Water from the small pressure tank
goes through a 3/4" hose to connect with a "T" fitting on an existing
3/4" galvanized pipe from a 93' deep well, the pipe being used to
transport water to the house and gardens for irrigating. The pressure
tank is 3 1/2' above floor level, so water being pumped from the hand
pump will flow into the house and fill toilets, sinks, etc, without the
need for carrying buckets of heavy water back and forth from house to
well. The hand pump with connected full-flow "Y" valves allows the
hand pump to be used to prime the deep well drop-pipe if required,
simply by opening the connecting valves.
The reason I used 3/4" garden
hoses and "Y" connectors is that they permit the entire system to be
easily disconnected for repairing, relocating, etc. To maintain
versatility, on the exit plumbing from the pump I used a 1 1/2", 90
degree PVC angle with 1 1/2" threads on one end and solvent glued the
straight end into the pump. Next came a 1 1/2" to 3/4" galvanized
reducer and a 3/4" NPT to 3/4" garden hose adapter (see photo at
top right). The outlet size of the pump itself was therefore left
at full diameter of 1 1/2" if that size was ever needed in a different
application, and the 3/4" hose from the outlet to the pressure tank will
flex under pressure and not develop a leak as can easily happen with
rigid plumbing.
Every hand pump installation is
different. There is no "one way" that is "correct" for every
possible contingency and requirements. I was lucky and found an
underground water source close to where I could easily plumb the system
into an existing well house. A good friend of mine found a shallow
depth water source on his property about 75 feet from his house.
He already had a pressure tank in a basement and lives where it is
colder, so plumbing from the well to the house is buried beneath the
frost line. He can pump indoors into his existing house plumbing
without going outdoors in stormy weather or snow.
The hand pump in my installation
is mounted to a sturdy 3/4" plywood table attached to a wall with strong
shelf brackets. The table height is very important and is one of
the reasons you should do as much of the installation yourself as you
possibly can. The operating handle on the hand pump is
pushed down to pump water, with most of the pressure (and therefore
effort) being at the end of the stroke, just before the handle is
vertical and beside the body of the pump. You should not have to
lean down or raise your arm too much when pumping - the ideal pump
stroke ending in a natural movement that is comfortable. It can
take several different trials of various heights for the table before a
good height is attained - I moved my table three times to get the right
height. If a plumber installs the entire system it likely will be
sized to fit the plumber, not you.
Extra fittings, either "Y"
adapters or "T" connectors, should be installed very close to the
well-head and just under the pump. Not only will those fitting
permit easy priming of the pipes and hoses, they will permit the entire
plumbing system to be cleaned and sanitized when desired. Let us
assume the well is located some distance from the hand pump. The
priming bucket system I show above can be connected to a "Y" or
"T" fitting at the well. The fitting under the pump can have a
short length of hose attached that drops into an empty 5 gallon pail.
The priming bucket is filled with a 25% bleach solution, set on a
sawhorse or other bench higher than the outlet, and the valves opened.
The bleach solution will then flow via gravity the entire length of the
pipe and cleanse it thoroughly. Without those fittings the well
itself would need to have much more bleach poured directly into the
well, then the hand pump operated for a long time to move all the bleach
water through the plumbing. A plumber is not likely to even think
of installing the extra "Y" or "T" connectors to enable easy flushing
and cleaning of the plumbing, another reason for doing the work yourself
and getting it right the first time.
THE END RESULT
With my hand pump set-up I can
quietly pump potable water in the absence of electric utility company
electricity for normal pumps or a noisy generator to power an electric
pump. Should an EMP pulse disrupt the power supply or other nasty
events happen which required discreet, non-attention getting methods of
getting water, this hand pump system will provide enough water to keep
body and soul together for relatively normal living and cleanliness.
Note: Some people prefer to
have a well bucket system ready to use if the power goes out for an
extended period of time. The advantage is that a well-bucket is
portable: if you move, you can take the well bucket with you
easier than pulling pipes out of a well as with a hand pump as
illustrated above. Of course the well bucket system could not be
effectively used again unless one know the depth of the well at a new
location and had sufficient cable to reach to that depth, but that is a
minor problem compared with having a well-bucket and pulley system in
hand for emergency use. One such well bucket system is produced by
Well WaterBoy Products.
http://waterbuckpump.com
|
|
|
