|
A guide to self reliant living |
||||||||||
|
6. Kerosene heaters and cookers
12.
Electrical; generators
Miles Stair's SURVIVAL
Miles Stair's
SURVIVAL |
MAKING CANDLES
MAKE YOUR OWN CANDLE WICKS Wicks can be made from any pure cotton string or twine. Thick string will provide more light, and is more suitable for larger diameter candles. Use a thin string for taper or votive candles. But cotton string "sputters" when burned unless it is first treated with boric acid. Take a roll or ball of cotton string and find a container into which it will fit completely, but not with a lot of excess room. Then make a solution of one (1) tablespoon of salt and two (2) tablespoons of Borax per cup of boiling water -- that IS the boric acid solution. Weigh down the ball of string in the container so it won't float up (find a rock), and pour in the boric acid solution, making sure you have enough to completely cover the cotton string. Let is soak for several days, then let it dry in the sun for several more days. If there are excess salt crystals covering the string, just wash them off with water and dry the ball of string again. Now you have the wicking necessary for making a lot of candles, cheap and easy! HOME MADE CANDLE MOLDS A candle mold can be any smooth sided, tapered metal container. For example, I use empty 14 ounce salmon cans for molds, as they have smooth sides and the slight taper necessary for the candle to be easily removed. Punch a small hole with an ice pick through the center of the bottom of the mold. Push the wick through the hole from the bottom, then pull it up enough so you can tie it to the center of a 16 penny nail. The nail will hold the top of the wick in the center of the mold. Turn the mold upside down and pull the wick tight, and seal the hole with a pinch of plumber's putty. Now the wick can be cut off about an inch from the putty, and the mold is ready to accept the melted wax or paraffin. Make at least a half dozen such molds with the wick centered and tight at one time. The plumber's putty can be reused many times before it gets hard and no longer seals, so it is very inexpensive in use.
The first step is to place the molds into a shallow pan of water, such as the bottom pan from a broiler "borrowed" from the kitchen. Put about a half inch of water into the pan, then put the molds into the water filled pan. The reason for the water is that you ARE going to spill some wax, and when the wax hits the water it will solidify and be easy to remove and melt again. But if the melted wax falls onto a dry surface, it sticks! The next step in candle making is to pour the melted paraffin at a temperature of at least 180 F into the molds: any cooler than that and the candles have a wrinkled surface. You will find that as the paraffin or wax cools it shrinks considerably. Once cool, the final step is to pour in enough paraffin to fill the depression in the candle caused by the shrinkage. To remove the candle from the mold, the wax must be cold. First remove the bit of plumber's putty from the bottom of the mold, then tug on the nail and the candle should come out. If it doesn't come out easily, then cut off the wick just below the nail and pound the mold gently on an old board. If the candle doesn't release from the mold then, it means the wax is still too warm and has not shrunk completely. The cooling process then can be speeded up by placing the candle molds into a pail of cold water, or into a freezer for a half hour. "Candle wax" (paraffin) has a "phase transformation" at about 50 degrees F, where it shrinks about 5%, so actual freezing is not necessary. Wait a few minutes after removing the mold from the freezer to allow the mold itself to warm up, and the candle should come out of the mold easily. If it does not, then warm water poured over the mold will expand the mold and then the candle should come out. Taper and votive candles are more difficult to remove from the molds. Candles that cannot be removed from molds, due to a rough interior surface of the mold, etc, can be removed by pouring a little boiling water over the mold, but that is rarely needed. Then pour boiling water into the mold to remove any roughness caused by old wax, and scour well, and the mold is restored to duty. Remember to make candles outside, as spilling wax is virtually guaranteed! But since paraffin and wax easily melt at about 150 F, and a tea kettle can heat water to over 212 F, clean up simply means boiling water. Hot, liquid wax dropped on a kitchen carpet, however, is extremely difficult to remove, so guys, melt it outside on the patio and keep peace in the house.
In the winter, candles may be made using a kerosene stove on a patio table to melt the wax, but with cautions: paraffin is very flammable, and it melts at only 150 F, so place a wide, thin pan* on the stove, fill it with water at least 2" deep, then melt the wax in an old stock pot. The water surrounding the stock pot will act as a heat buffer, transferring enough heat to the stock pot to easily melt the wax, and any drips will fall safely into the water. * This pan can be a metal pet food tray, a metal oil drain pan, a "hog tray," or any pan at least 12" wide and 3 or 4 inches high.
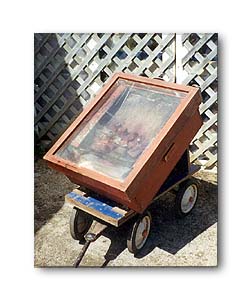
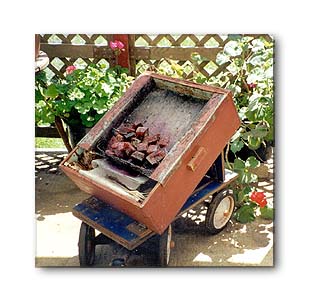
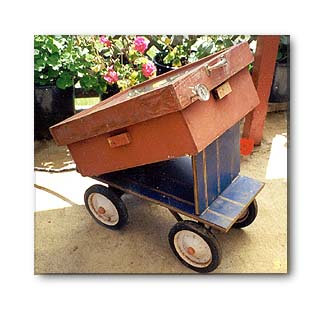
On a normal summer day without clouds, my solar melter will melt about 4 bread pans of paraffin per day, which is sufficient for about 20 large salmon can candles that will burn for about 24 hours each. Because the solar melter will produce 200 degree melted paraffin in less than two hours of direct sunlight, large scale production of candles means having a lot of molds, as the wax does not cool fast enough to recycle molds within 2 hours. I normally work with at least 20 molds, for example. When working with a solar oven and 200 degree paraffin, remember that everything is HOT, so you will need to wear a pair of leather gloves. As the gloves will get wax on them, it is better to have a pair of gloves set aside for just that purpose. Here is my routine when using the solar oven for melting wax. At about 10:00 AM, I tow the solar oven from under cover and point it East, so the shadow from the sun falls about 6 inches to the left side of the raised solar oven. The cover to the unit is removed, and bread pan full of recycled candle wax is placed on the melting tray. There is already another bread pan under the drain end of the tray covered with a piece of aluminum window screen, which acts as a filter. Before noon, the sun's shadow is about 6 inches to the right side of the solar melter, and the wax is melted and holding about 200 degrees F. Another bread pan full of recycled wax chunks is ready. The lid of the oven is quickly removed and the melting tray removed and laid flat on the ground. The bread pan of wax chunks is scattered in the hot melting tray. Next, the window screen filter is removed from the pan of melted paraffin in the solar melter and placed on the spare, now empty bread pan. Very carefully - and wearing leather gloves - the bread pan of hot liquid paraffin is removed from the oven and placed flat on the ground. The empty bread pan is placed in the oven, then the melting tray, the lid/cover of the solar oven is replaced, and finally the oven thermometer is placed back through the hole in the upper part of the solar oven. This process takes less than 2 minutes, as I want to retain as much heat as possible in the solar oven. The hot bread pan full of melted wax is very carefully carried to the candle molds and the wax poured into the previously prepared molds while still as hot as possible. The quality of the candle is directly related to the temperature at which the paraffin is when poured into the mold. Wax at 155 degrees makes very ugly, wrinkled candles, as the wax cools too fast on contact with the metal sides of the mold. Wax poured at about 200 degrees heats up the mold sufficiently to produce smooth sided candles that are pretty. The next step is to return to the solar melter and turn it to again be slightly past the sun, so as the sun moves across the horizon the angle of the sun's heat rays is directly into the solar oven, then moves slightly past. The final steps are to fill the now-empty bread pan with more chunks of paraffin, used candle wax, reclaimed drippings from a commercial candle maker, whatever you can find inexpensively, and get more molds set up with wicks strung between a nail and plumber's putty, as in two hours or less they are going to be needed again! MAKING CANDLES PRETTY As candles come from the mold, they are not generally pretty - there can be wrinkles, surface imperfections, etc. When candles are mass produced with a large quantity of melted wax from a stock pot or solar melter, however, is not the time to worry about that. Once you have a large supply of candles, then you can make them pretty. Candles may be held by the wick with a pair of pliers and dipped in hot water, and the surface melts just enough to give candles a hand made appearance. Candles may also be dipped in a different color melted wax or dipped into wax in which little speckles have been added, giving them a very unique look. For information on making traditional candles, candle molds, etc, please visit ArtNCandle. ------------------
|
|
||||||||