|
SITE
INDEX
QUICKENING
NEWS
PREPARATIONS
1.
Food
2.
Manna
Meals
3.
Water
4.
Sanitation
5.
Medical,
health
6.
Kerosene heaters and cookers
7.
Lighting
8. Wood
cooking and heating
9. Communi-cations
10. Essential
Tools
11. Home
built items
12.
Electrical; generators
and power
13. War
preparedness
14.
Gardening
SITE
INDEX
Miles Stair's SURVIVAL
SHOP
HOME
RADIATION
INDEX & JET STREAM
PROPHECY
COMMENTARY
BY MILES
BOOKLETS
BY MILES
GUEST
SUBMISSIONS
PHOTO
INDEX
LINKS
SITE
INDEX
Miles Stair's SURVIVAL
SHOP
|
|
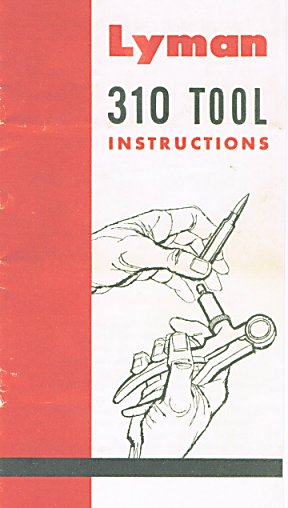
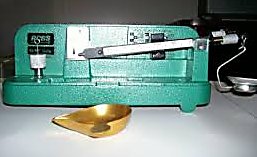
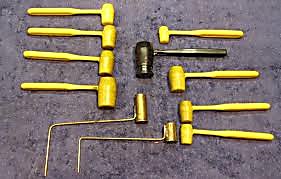
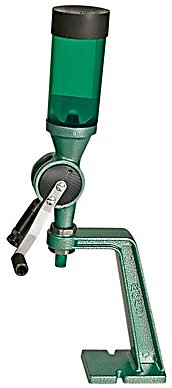
Using Lyman 310 Tong
Tools for Reloading
I purchased my first
Lyman Tong Tools in 1964 so I could do load development work
at the range. They worked so well I expanded the
selection of dies to include all of my most popular
cartridges, and the handles, dies, loading blocks, primer
flipper and Lee Dipper Set all fit into a single 50 caliber
ammo box. Yes, they neck size only and some people like
to denigrate 310 tools for that supposed deficiency, but in
many cases neck sizing is all that is needed for bottle neck
cases. Lyman 310 Tong Tools do full length resize
straight sided cases for pistols and revolvers.
If pressures are kept to
SAAMI standards, neck sizing is sufficient for bottle necked
cartridges which have been previously fired in that chamber.
The very unique Lyman "M" die, also called the neck expanding
die, is a fabulous design which is fantastic when reloading
using cast bullets. Loads for cast lead bullets are
almost by definition mild pressure loads: Brass lasts
virtually forever and so do rifle barrels. And cast
bullets cost only a fraction of the per-cost shot compared to
using jacketed bullets.
|
This section of
photos was scanned from an old Lyman brochure for using
the Lyman 310 Tools. It was a small brochure and
old, so the wording was difficult to scan to make it easy
to read. I have typed in the exact wording in this
column to make it easier to read.
These instructions are far from
complete. I have added NOTES below the relevant sections
for additional tools that make reloading vastly easier and
much more organized. |
 |
|
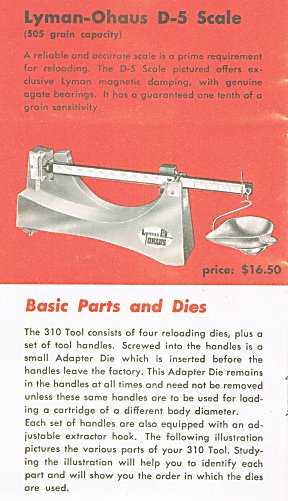
Lyman-Ohaus D-5 Scale
A reloading scale is extremely
nice to have. I prefer the Ohaus scale that fits neatly
into the base and has a protective cover. My scale
was purchased in 1964 and is still in perfect condition,
thanks, I am sure, to the easy storage system.
Basic Parts and Dies
The 310 Tool consists of four
reloading dies, plus a set of tool handles. Screwed into
the handles is a small Adapter Die which is inserted
before the handles leave the factory. This Adapter Die
remains in the handles at all times and need not be
removed unless the same handles are to be used for
loading a cartridge of a different body diameter. Each set
of handles are also equipped with an adjustable extractor
hook. The following illustration pictures the various
parts of your 310 Tool. Studying the illustration will
help you identify each part and will show you the order in
which the dies are used. |
 |
`
|
Pre-Loading
Instructions
Carefully inspect each fired case before reloading.
Reject all cases which show signs of cracks or splits
about the necks or bodies. The fired cases which pass
inspection should then be tried into the chamber of your
rifle or handgun to insure that they fit.
Cases which do not fit into the gun chamber will require
FULL LENGTH RESIZING and for these cases you will need an
additional Full Length (hand type) Resizing Die (see Lyman
Catalog). The remaining cases may be reloaded with
your 310 tool.
The cases which are
to be loaded should be lubricated. This is done by
wiping the outside of each case neck with an oily cloth,
or a cloth sparingly greased with Lyman Size-Ezy
Lubricant. After reloading and before firing, always
wipe your cases to remove the sizing lubricant.
NOTE:
It is far better to use a large stamp pad for lubricating
the case necks. A cloth-covered felt pad in a stamp
pad can be carefully scraped clean with a knife to remove
debris. After a decade of use the stamp pad
cover will become worn. The cover can be removed and
replaced with a section of finely-woven handkerchief
material. I use
Neatsfoot Oil as a lubricant. Each lubricated
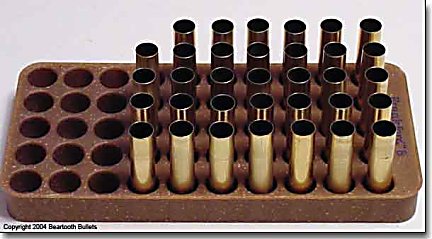
case is then set in a loading block (see below).

|
 |
`
|
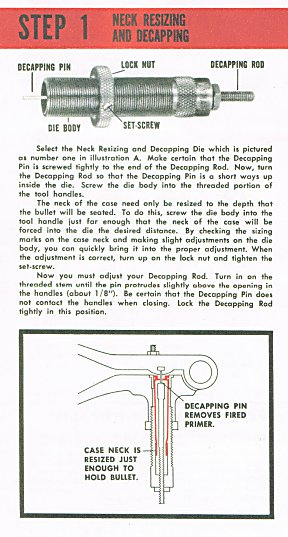
Step 1 Neck Resizing and Decapping
Select the Neck
Resizing and Decapping Die which is pictured as number one
is illustration A. Make certain that the Decapping Pin is
screwed tightly to the end of the Decapping Rod.
Now, turn the Decapping Rod so that the Decapping Pin is a
short ways up inside the die. Screw the die body
into the threaded portion of the tool handles.
The neck of the case need only be resized to the depth
that the bullet will be seated. To do this, screw
the die body into the tool handle just enough that the
neck of the case will be forced into the die the desired
distance. By checking the sizing marks on the case
neck and making slight adjustment to the die body, you can
quickly bring it into the proper adjustment. When the
adjustment is correct, turn up the lock nut and tighten
the set-screw.
Now you must
adjust the Decapping Rod. Turn in on the threaded
stem until the pin protrudes slightly above the opening in
the handles (about 1/8"). Be certain that the Decapping
Pin does not contact the handles when closing. Lock
the Decapping Rod tightly in this position.
NOTE: For this procedure
you should have two Loading Blocks, moving each lubricated case as it
is necksized into the other block.
 |
 |
|
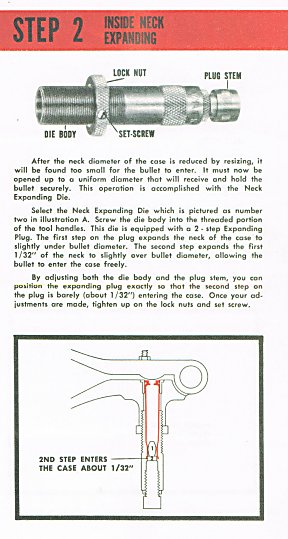
STEP 2 INSIDE NECK EXPANDING
After the neck diameter of the case is reduced by
resizing, it will be found too small for the bullet to
enter. It must now be opened up to a uniform diameter that
will receive and hold the bullet securely. This operation
is accomplished with the Neck Expanding Die.
Select the Neck Expanding Die which is pictured as number
two in Illustration A. Screw the die body into the
threaded portion of the tool handles. This die is equipped
with a 2-step Expanding Plug. The first step on the plug
expands the neck of the case to slightly under bullet
diameter. The second step expands the first 1/32" of
the neck to slightly over bullet diameter, allowing the
bullet to enter the case freely.
By adjusting both the die body and the plug stem, you can
position the expanding plug exactly so that the second
step on the plug is barely (about 1/32") entering the
case. Once your adjustments are made, tighten up on the
lock nuts and set screw.
NOTE: Before the lock ring is
set, try a bullet base in the case mouth to ensure it fits
into the short expanded section. This is extremely
important, especially when loading cast bullets. When
finished with all the cases, carefully wipe each case with
a dry cloth to remove all lubricant.
This die can often be used for any cartridge of the same
diameter, ie, a .308 size expander die will expand the
neck of virtually all .30 caliber cases. |
 |
`
|
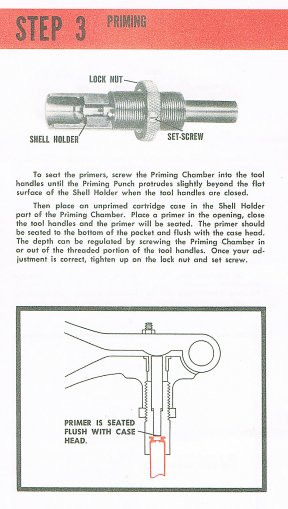
STEP 3 PRIMING
To seat the primers, screw the Priming Chamber into the
tool handles until the Priming Punch protrudes slightly
beyond the flat surface of the Shell Holder when the tool
handles are closed.
Then place an
unprimed cartridge case in the Shell Holder part of the
Priming Chamber. Place a primer in the opening, close the
tool handles and the primer will be seated. The primer
should be seated to the bottom of the pocket and flush
with the case head. The depth can be regulated by screwing
the Priming Chamber in or out of the threaded portion of
the tool handles. Once your adjustment is correct, tighten
up on the lock nut and set screw.
NOTE: It is far easier
to hold the Tong Tool so the die body is off to one side,
not straight down as illustrated at right. Set a primer in
the groove, then a case in the shell holder, and close the
handles to seat the primer.
Primers are not fungible: use the proper primer for the
case being reloaded - small primer for pistol or revolver
cases using a .175" primer, a large pistol primer for
cases like .44 Special using a .210" diameter primer, and
rifle primers by size in the appropriate cases. Pistol
primers are softer and cannot handle the pressures
developed in rifle cases, and often a harder rifle primer
cannot be ignited by the firing pin of a pistol or
revolver. |
 |
|
CHARGING A CASE WITH POWDER
This step is completely missing from the
factory instructions for 310 Tools. Smokeless powder can
be measured or weighed, or a combination of the two can be
used.
For easy, portable reloading, a Lee Powder Measure set can
work well. A loading manual for the cartridge you are
reloading is mandatory to give you the powder charge
weights by cartridge and bullet weight you are using, AND
a listing of the powder weight for each Lee Dipper is
imperative. I have those tables listed for three
different smokeless powders in my
Survival Reloading booklet.
A
Powder Scale weighs each powder charge in grains and is
the most accurate method of loading powder, but is slow.
When using either a dipper or scale, the powder is poured
into a cartridge case using a Powder Funnel.
A Powder Measure
is adjustable and "throws" a measure of powder by volume.
The volume of powder then must be weighed on a powder
scale and the drum on the powder measure adjusted until it
"throws" the same volume (and therefore weight) of powder
each time the handle is turned to fill up the drum from
the powder hopper. When properly adjusted, cases can
be charged with powder directly from a Powder Measure, BUT
the throw weight should be checked on a Powder Scale every
10th or 20th charge.
|
 Lee Powder Dippers
Ohaus Powder Scale
 RCBS Powder Measure
 Powder Funnel
 |
|
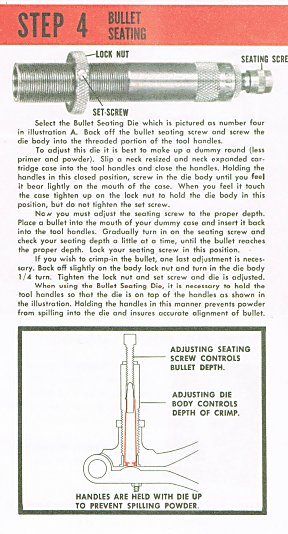
STEP 4 BULLET SEATING
Select the Bullet Seating Die which is pictured as number
four in illustration A. Back off the bullet seating screw
and screw the die body into the threaded portion of the
tool handles.
To adjust this die
it is best to make up a dummy round (less primer and
powder). Slip a neck resized and neck expanded cartridge
case into the tool handles and close the handles. Holding
the handles in this closed position, screw in the die body
until you feel it bear lightly on the mouth of the case.
When you feel it touch the case tighten up on the lock nut
to hold the die body in this position, but do not tighten
the set screw.
Now you must
adjust the seating screw to the proper depth. Place a
bullet into the mouth of your dummy case and insert it
back into the tool handles. Gradually urn in on the
seating screw and check your seating depth a little at a
time, until the bullet reaches the proper depth. Lock your
seating screw in this position.
If
you wish to crimp-in the bullet, one last adjustment is
necessary. Back off slightly on the body lock nut and turn
in the die body 1/4 turn. Tighten the lock nut and set
screw and the die is adjusted.
When using the Bullet Seating
Die, it is necessary to hold the tool handles so that the
die is on top of the handles as shown in the illustration.
Holding the handles in this manner prevents powder from
spilling into the die and insures accurate alignment of
the bullet.
NOTE: Crimping the bullet is
not needed when loading for bolt action rifles. |
 |
`
Ideal #310 Tool Quick Reference - Rifle
CTG
|
Handle |
Adapter
|
Priming
|
MR - DA
|
Exp Chamb
|
Exp - Cast
|
Exp - Jack
|
Seat - Cast
|
Seat - Jack
|
|
1 |
2 |
3 |
4 |
5 |
6 |
7 |
8 |
9 |
10 |
|
218 Bee |
S |
3 |
10 |
172 |
R-S |
0.225 |
0.224 |
438 |
450 |
|
219
Wasp |
L |
6 |
6 |
171 |
R-S |
0.225 |
0.224 |
438 |
450 |
|
219
Zipper |
L |
6 |
6 |
171 |
R-M |
0.225 |
0.224 |
438 |
450 |
|
22
Hornet |
S |
4 |
4 |
165 |
R-S |
0.224 |
0.224 |
438 |
450 |
|
22 K
Hornet |
S |
4 |
4 |
165 |
M-S |
0.224 |
0.224 |
438 |
450 |
|
22/250
Var. |
L |
2 |
2 |
22/250 |
R-M |
0.225 |
0.224 |
438 |
450 |
|
22
Lovell |
S |
12 |
19 |
173 |
M-S |
0.225 |
0.224 |
438 |
450 |
|
22 Sav
H. |
L |
6 |
6 |
141 |
R-M |
0.228 |
0.225 |
367 |
367 |
|
220
Swift |
L |
5 |
5 |
169 |
R-M |
0.224 |
0.224 |
438 |
450 |
|
222 Rem. |
S |
1 |
26 |
222 |
R-M |
0.225 |
0.224 |
438 |
450 |
|
25/20
Rept. |
S |
3 |
10 |
10 |
R-S |
0.257 |
0.257 |
420 |
420 |
|
25/35 |
L |
6 |
6 |
11 |
R-M |
0.257 |
0.257 |
325 |
325 |
|
25 Rem. |
L |
6 |
15 |
133 |
R-M |
0.257 |
0.257 |
325 |
325 |
|
250/3000 |
L |
2 |
2 |
143 |
R-M |
0.257 |
0.257 |
388 |
418 |
|
257
Robt. |
L |
2 |
8 |
166 |
R-M |
0.257 |
0.257 |
388 |
418 |
|
6.5 Jap |
L |
2 |
2 |
137 |
R-M |
0.266 |
0.263 |
469 |
418 |
|
6.5
Mann. |
L |
5 |
5 |
137 |
R-M |
0.266 |
0.263 |
469 |
418 |
|
270
Win. |
L |
2 |
2 |
153 |
R-L |
0.280 |
0.277 |
468 |
411 |
|
7 m/m |
L |
2 |
2 |
116 |
R-M |
0.287 |
0.285 |
448 |
377 |
|
30
Carbine |
S |
15 |
23 |
29 |
R-S |
0.309 |
0.308 |
8 |
359 |
|
30/30 |
L |
6 |
6 |
13 |
R-M |
0.311 |
0.308 |
241 |
241 |
|
308
Win. |
L |
2 |
2 |
146 |
R-M |
0.311 |
0.308 |
413 |
329 |
|
300 Sav. |
L |
2 |
2 |
146 |
R-M |
0.311 |
0.308 |
466 |
414 |
|
30/40 |
L |
5 |
7 |
15 |
R-M |
0.311 |
0.308 |
467 |
329 |
|
30/06 |
L |
2 |
2 |
123 |
R-L |
0.311 |
0.308 |
413 |
329 |
|
300 H.
& H. |
L |
8 |
13 |
168 |
R-L |
0.311 |
0.308 |
467 |
329 |
|
7.62
Russ. |
L |
10 |
16 |
163 |
R-L |
0.311 |
0.308 |
413 |
329 |
|
303 Sav. |
L |
5 |
5 |
16 |
R-M |
0.311 |
0.308 |
241 |
329 |
|
303
Brit. |
L |
5 |
7 |
17 |
R-M |
0.313 |
0.311 |
299 |
299 |
|
7.7 Jap |
L |
2 |
2 |
146 |
R-M |
0.311 |
0.308 |
413 |
329 |
|
32/20 |
S |
3 |
10 |
29 |
R-S |
0.311 |
0.308 |
8 |
8 |
|
32/40 |
L |
6 |
6 |
28 |
R-M |
0.321 |
0.319 |
232 |
232 |
|
32
Spec. |
L |
6 |
6 |
97 |
R-M |
0.321 |
0.319 |
297 |
317 |
|
8 m/m |
L |
2 |
2 |
118 |
R-M |
0.323 |
0.323 |
470 |
366 |
|
33 Win. |
L |
10 |
17 |
98 |
SPC |
0.338 |
0.338 |
320 |
320 |
|
348
Win. |
SPC |
11 |
18 |
170 |
SPC |
0.350 |
0.350 |
447 |
447 |
|
35 Rem. |
L |
5 |
20 |
128 |
SPC |
0.358 |
0.356 |
315 |
315 |
|
35 Win. |
L |
5 |
7 |
124 |
SPC |
0.358 |
0.356 |
318 |
318 |
|
9 m/m
rifle |
L |
11 |
2 |
126 |
SPC |
0.358 |
0.356 |
238 |
238 |
|
375 H.
& H. |
L |
8 |
13 |
162 |
SPC |
0.375 |
0.375 |
449 |
449 |
|
38/40 |
S |
9 |
14 |
42 |
R-S |
0.401 |
0.401 |
43 |
43 |
|
38/55 |
L |
6 |
6 |
44 |
SPC |
0.379 |
xxx |
296 |
xxx |
|
401
Win. |
S |
16 |
2 |
147 |
R-M |
0.412 |
xxx |
426 |
xxx |
|
405
Win. |
L |
2 |
7 |
121 |
R-L |
0.412 |
xxx |
263 |
xxx |
|
44/40 |
S |
9 |
14 |
78 |
R-S |
0.427 |
xxx |
98 |
xxx |
|
45/70 |
L |
10 |
17 |
89 |
R-L |
0.457 |
xxx |
124 |
xxx |
|
45/90 |
L |
10 |
17 |
89 |
R-L |
0.457 |
xxx |
191 |
xxx |
Ideal #310 Tool Quick Reference - Pistol
CTG
|
Handle
|
Adapter
|
Priming
|
MR - DA
|
Exp Chamb
|
Exp - Cast
|
Exp - Jack
|
Seat - Cast
|
Seat Jack
|
|
1 |
2 |
3 |
4 |
5 |
6 |
7 |
8 |
9 |
10 |
|
30
Luger |
S |
17 |
12 |
120 |
P-S |
0.311 |
xxx |
244 |
xxx |
|
32 S. &
W. L. |
S |
3 |
9 |
122 |
P-S |
0.313 |
xxx |
226 |
xxx |
|
32
Auto. |
S |
3 |
9 |
SPC |
P-S |
0.312 |
xxx |
252 |
xxx |
|
32 S. &
W. |
S |
3 |
9 |
22 |
P-S |
0.313 |
xxx |
249 |
xxx |
|
32/20 |
S |
3 |
10 |
29 |
P-S |
0.311 |
xxx |
8 |
xxx |
|
357 Mag. |
S |
1 |
3 |
95 |
SPC |
0.357 |
xxx |
446 |
xxx |
|
9 m/m
Luger |
S |
17 |
12 |
134 |
SPC |
0.356 |
xxx |
402 |
xxx |
|
38
Auto. |
S |
17 |
12 |
119 |
SPC |
0.358 |
xxx |
242 |
xxx |
|
38 Spc. |
S |
1 |
1 |
95 |
SPC |
0.358 |
xxx |
311 |
xxx |
|
380
Auto. |
S |
17 |
12 |
144 |
SPC |
0.358 |
xxx |
242 |
xxx |
|
38/40 |
S |
9 |
14 |
42 |
SPC |
0.401 |
xxx |
43 |
xxx |
|
41 Long |
S |
14 |
25 |
72 |
P-S |
0.386 |
xxx |
178 |
xxx |
|
44
Russ. |
S |
9 |
7 |
150 |
P-S |
0.429 |
xxx |
251 |
xxx |
|
44
Spec. |
S |
9 |
7 |
150 |
P-S |
0.429 |
xxx |
421 |
xxx |
|
44/40 |
S |
9 |
14 |
78 |
P-S |
0.427 |
xxx |
98 |
xxx |
|
45
Auto. Rim |
S |
7 |
17 |
127 |
P-S |
0.452 |
xxx |
423 |
xxx |
|
45
Auto. |
S |
7 |
2 |
127 |
P-S |
0.452 |
xxx |
374 |
xxx |
|
45 Colt |
S |
7 |
11 |
86 |
P-S |
0.454 |
xxx |
190 |
xxx |
|
|
|
