|
A guide to self reliant living |
||||||||||
|
6. Kerosene heaters and cookers
12.
Electrical; generators
Miles Stair's SURVIVAL
Miles Stair's
SURVIVAL |
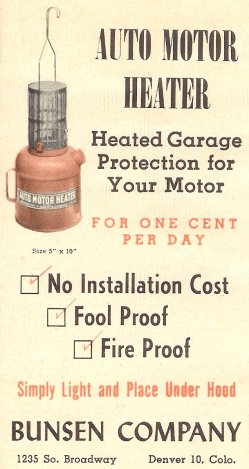
AUTO MOTOR HEATER INSTRUCTIONS
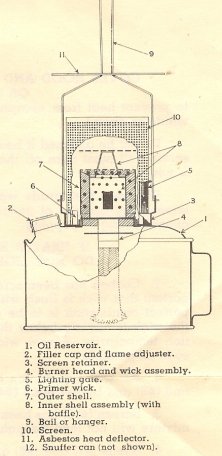
PLACING HEATER IN CAR: Attach asbestos sheet (#11) by slipping over hook of bail (#9). Hang heater to cross bar under hood if convenient. If not, place in LEVEL position. TO EXTINGUISH: Remove heater and place snuffer can over screen (#10). Leave snuffer can on screen until next lighting. TO REPLACE WICK: If wick becomes carbonized, remove screen (#10), inner shell (#8), and outer shell (#7). Remove wick assembly by lifting out burner head (#4). Loosen hard carbon on wick by scratching with pointed instrument. This will lengthen life of wick temporarily. THE TOP OF THE WICK SHOULD BE FLUSH WITH WICK CONTAINER TUBE AT ALL TIMES. If wick cannot be brought up flush with wick container tube, we recommend purchase of a new wick. TO USE AS EMERGENCY ROAD FLARE: Remove screen (#10) and inner shell assembly (#8),. Light center wick. KEEP HEATER UPRIGHT AT ALL TIMES CAUTION: If kerosene splashes thru burner head and soaks primer wick the heater will smoke and soot up. (If primer wick should get soaked with kerosene, remove screen, light primer wick and allow it to burn completely out.) Screen must be free of soot at all times. If screen is punctured in any way, the burner is not fireproof until screen is replaced with new one. DO NOT ALLOW HEATER TO BURN COMPLETELY OUT OF FUEL. THIS ACTUALLY BURNS THE WICK, DESTROYING IT OR SHORTENING ITS LIFE. COVER HOOD AND RADIATOR WITH BLANKET OR TARPAULIN to prevent heat from escaping. (You can't heat a room with the windows open.) Do not be alarmed if heater smokes on first burning. The preserving oil must burn off the screen, lasts only two minutes and is non-recurring. IF HEATER BURNS IMPROPERLY, DO NOT LIGHT IT AGAIN UNTIL: 1. Carbon has been scraped from wick (#4). It is vitally important that wick is flush with opening in metal wick container if perfect combustion is to be obtained. If in scraping the carbon the wick is slightly below the wick container, the unit will function temporarily. A new wick assembly should be installed as soon as possible. 2. All soot and carbon have been removed from shells (#7) and (#8) and burner head (#4). 3. Screen (#10) has been thoroughly cleaned. (The proper air mixture will not feed through a dirty screen.) 4. Shells (#7) and (#8) are properly seated. THEN LIGHT AND THE HEATER IS AS GOOD AS NEW TO ASSEMBLE BURNER HEAD 1. Insert Wick assembly (#4) in Oil Reservoir (#1). 2. Seat Outer Shell (#7). 3. Seat Inner Shell Assembly (#8). NOTES FROM MILES STAIR
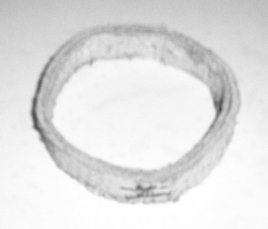
The Asbestos Heat Deflector (#11 above) was not available from the factory after the 1950's, and is almost never found today. Keep the heater at least one foot below any painted surfaces or anything combustible. Wicks for Auto Motor Heaters and the Bunsen-Davy Motor Heater are available in my Wick Shop.
|
1. Food | 2.
Manna Meals | 3. Water |
4. Sanitation | 5. Medical, health |
| 6. Kerosene heaters and cookers | 7. Lighting | 8. Wood cooking and heating | | 9. Communications | 10. Essential Tools | 11. Home built items | | 12. Electrical; generators and power | 13. War preparedness | 14. Gardening |
| HOME |
PROPHECY
| PREPARATIONS
| QUICKENING
NEWS | COMMENTARY
BY MILES |
| GUEST SUBMISSIONS | BOOKLETS BY MILES | CONTACT INFORMATION | | LINKS | RADIATION INDEX & JET STREAM | DEVOTIONAL ITEMS | | PHOTO INDEX | LIBRARY | SURVIVAL SHOP
|
|
||||||||